
Side Dishes
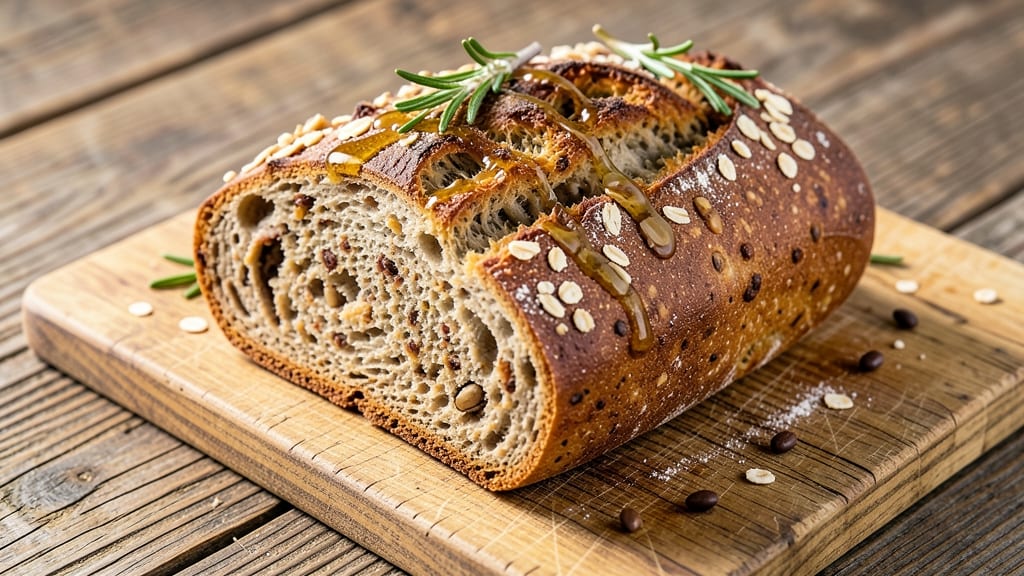
This 6-grain bread recipe delivers a rustic loaf with a nutty crunch and golden crust—perfect for sandwiches, toast, or gourmet dinners. 🌾 The blend of whole wheat, rye, barley, and other grains creates a hearty texture with subtle sweetness and earthy depth.
I’ve baked this loaf dozens of times, and it never fails to impress with its crispy exterior and tender crumb. The key to success lies in the fermentation process—allowing the dough to rise slowly develops rich flavor and a satisfying chew.
You’ll work with a mix of flours and seeds, including sunflower and flax, which add texture and nutritional benefits. The dough is forgiving but requires patience, especially during the overnight cold proof, which enhances flavor and structure.
By the time you pull this loaf from the oven, you’ll have a crusty, aromatic loaf with a crackly top and a crumb that’s both sturdy and inviting. The seeded swirls add visual appeal and a satisfying crunch with every bite.
This bread is ideal for homemade sandwiches, garlic toast, or serving alongside soups and stews. For best results, use a Dutch oven to trap steam and create that signature oven-spring. Once baked, let it cool completely before slicing—this ensures clean cuts and prevents a gummy texture.
Store wrapped at room temperature for up to 5 days or freeze for longer shelf life. Let’s get started!
Ingredients for 6 grain bread
Six flours, four seeds, and a touch of patience—this rustic loaf delivers golden crust and nutty crunch every time.
| Ingredient | Amount | Notes |
|---|---|---|
| Whole Wheat Flour 🌾 | 2 cups | Lightly sifted for even texture |
| Rye Flour 🌾 | 1 cup | Dark rye for robust flavor |
| Barley Flour 🌾 | ½ cup | Adds nutty undertones |
| Spelt Flour 🌾 | ½ cup | Mild sweetness to balance |
| Buckwheat Flour 🌾 | ½ cup | Earthy depth, no gluten |
| Oat Flour 🌾 | ½ cup | Fine texture, light color |
| Active Dry Yeast 🍞 | 1 ½ tsp | Freshly opened for potency |
| Granulated Sugar 🍚 | 1 tbsp | Feeds yeast, not too sweet |
| Instant Yeast 🍞 | 1 ½ tsp | For overnight cold proof |
| Sunflower Seeds 🌻 | ½ cup | Toasted for extra crunch |
| Flaxseeds 🌱 | ¼ cup | Ground for omega benefits |
| Sesame Seeds 🌰 | ¼ cup | Toasted for nutty aroma |
| Poppy Seeds 🌸 | ¼ cup | Bright pop of color |
| Kosher Salt 🧂 | 2 tsp | Diamond Crystal preferred |
| Extra-Virgin Olive Oil 🫒 | ½ cup | High-quality for flavor |
| Warm Water 💧 | 1 ½ cups | 110°F for yeast activation |
The flours are the heart of this bread. Bob's Red Mill has the best organic blend for home bakers, but any quality brand works—just measure carefully since densities vary. Rye and buckwheat add depth, while spelt and oat keep it light. For seeds, Trader Joe's sells pre-toasted mixes that save time. The yeast is non-negotiable here: use freshly opened active dry yeast for the initial rise and instant yeast for the cold proof. Pro tip: if your kitchen runs warm, reduce yeast by 10%—this dough ferments fast. The olive oil should be fruity and peppery; California-grown brands excel here.
No sunflower seeds? Pumpkin seeds work too, though they're nuttier. Running short on flax? Chia seeds at double the amount give similar texture. The toasted seeds are worth the extra minute—they add crunch and visual appeal. For the water, filtered is best (chlorine kills yeast), but tap water works if you let it sit out overnight. Need to adjust hydration? Add 1 tbsp more water if the dough feels stiff after mixing. And if you're using a stand mixer, switch to the dough hook after 2 minutes to avoid overmixing—this bread thrives on gentle development.
This dough keeps beautifully. Shape it into a loaf, wrap tightly in plastic, and refrigerate for up to 3 days before baking—flavor actually improves with time. For longer storage, freeze the shaped loaf (unbaked) for 3 months24 hours is ideal for maximum crispness. Store wrapped at room temperature for 5 days or freeze sliced bread for 6 months. The crust stays crispy for days if you reheat slices in a 350°F oven for 5 minutes—perfect for garlic toast.
Why You'll Love This Recipe
- No-Knead Magic: I swear, this bread comes together with just a bowl, a spoon, and 15 minutes of hands-off time. The flours blend so smoothly—rye’s earthy bite cuts through buckwheat’s nuttiness—that it feels like a hug for your taste buds without the fuss.
- Earthy Depth: That first bite? Crispy crust, then a chewy center with layers of flavor—rye’s tang, barley’s toasty warmth, and spelt’s gentle sweetness. Honestly, it’s the kind of bread that makes store-bought loaves feel like a letdown.
- Weeknight Swiss Army: Toast it for breakfast, use it for sandwiches, or tear it into croutons for salads. Between us, I’ve even mashed it into a quick flatbread for tacos. It’s the one loaf that does it all without needing a sidekick.
- Budget-Friendly Staple: I buy these flours in bulk—they last forever—and a single batch stretches to feed my family for days. Leftovers? Toss them in the freezer, and you’ve got a ready-made baguette for soups or grilled cheese. Smart, simple, and satisfying.
Step-by-step instructions for 6-Grain bread recipe
Here's how to craft a rustic, nutty loaf with a crisp crust and seeded swirls—no shortcuts, just flavor.
👨🍳 Step 1: Toast the Seeds for Maximum Flavor
Preheat your oven to 350°F and spread the sunflower seeds, sesame seeds, and poppy seeds on a baking sheet. Toast for 8-10 minutes, stirring every 2 minutes, until they turn golden and fragrant. Let them cool completely before using—their aroma will infuse the dough.
Toasted seeds add depth of flavor and a satisfying crunch. If you're short on time, skip toasting, but the flavor difference is noticeable. Once cooled, divide them evenly: ¼ cup for the dough and ¼ cup for the swirls. Keep the extra seeds handy for garnishing later.
🍳 Step 2: Activate the Yeast and Mix the Dough
In a large bowl, whisk together 1.5 cups warm water (110°F), 1 tbsp granulated sugar, 1.5 tsp active dry yeast, and 1.5 tsp instant yeast. Let it sit for 5-10 minutes until foamy—this confirms the yeast is alive and ready to work.
In a separate bowl, combine 2 cups whole wheat flour, 1 cup rye flour, 0.5 cup barley flour, 0.5 cup spelt flour, 0.5 cup buckwheat flour, 0.5 cup oat flour, and 2 tsp kosher salt. Whisk lightly to break up clumps, but don’t overmix. Pour in the yeast mixture and 0.5 cup extra-virgin olive oil, then stir with a wooden spoon until a shaggy dough forms.
🥘 Step 3: Knead and Incorporate the Seeds
Turn the dough onto a lightly floured surface and knead for 8-10 minutes until smooth and elastic. This step develops gluten for structure—press and fold the dough repeatedly to strengthen it. If it feels too sticky, add 1 tbsp flour at a time until it’s manageable.
Once kneaded, press ¼ cup toasted seeds into the dough by hand, folding them in gently. This ensures even distribution. Shape the dough into a rough ball, place it in a lightly oiled bowl, cover with a damp towel, and let it rise in a warm place for 1-2 hours or until doubled in size. The dough should feel springy when pressed lightly.
⏰ Step 4: Shape and Cold Proof for Crispy Crust
Punch down the risen dough to release air, then divide it into two equal pieces. Roll each piece into a 12-inch log, about 2 inches thick. Gently press ¼ cup toasted seeds into the center of one log, then roll it up like a jelly roll to create a seeded swirl. Repeat with the second log.
Place the shaped loaves seam-side down in a 9x5-inch loaf pan, cover with a damp towel, and refrigerate overnight (12-16 hours). Cold proofing enhances flavor and ensures a crisp crust. The next morning, remove the loaves from the pan and let them sit at room temperature for 1 hour before baking.
🔥 Step 5: Bake to a Golden, Crunchy Perfection
Preheat your oven to 375°F with a baking stone or inverted baking sheet on the lower rack. Brush the loaves with extra-virgin olive oil and sprinkle the remaining ¼ cup toasted seeds on top for extra crunch. Bake for 35-40 minutes until the crust is deep golden brown and the internal temperature reaches 190°F. Tap the bottom—the bread should sound hollow.
Let the bread cool on a wire rack for at least 1 hour before slicing. The crust will crisp up as it cools, and the seeded swirls will add texture and flavor to every bite. Store wrapped at room temperature for 2-3 days or freeze for up to 3 months.
Pro Tips For Making 6 Grain Bread
- Mix Flours First: Combine all your flours—whole wheat, rye, barley, spelt, and buckwheat—before adding water. I learned this the hard way: adding them one by one leads to uneven hydration and a dense loaf. Weigh them together, then sift if needed, so the mix behaves like a single flour.
- Hydrate Buckwheat Separately: Buckwheat flour absorbs water like a sponge. Mix it with your yeast and a little extra water (about 10% more) in a separate bowl before combining with the rest. This prevents a gummy, uneven dough—trust me, your future self will notice the difference.
- Skip the Over-Kneading: With six flours, this dough won’t behave like wheat-only bread. Knead just until the ingredients come together—about 5-7 minutes by hand. Overworking it activates too much gluten, and you’ll end up with a tough, chewy loaf instead of a light, airy crumb.
- Proof in a Warm Spot: Place your shaped loaf in a warm oven (turned on to 200°F with a bowl of boiling water on the bottom) for 20 minutes before baking. This mimics a professional proofer and gives the yeast the consistent warmth it needs—no more flat, sad loaves. (Yes, even if you’re impatient like me.)
Pro cooking tips for perfect results
Seed Toasting Secrets
Toast your seeds at 350°F for 8-10 minutes, stirring every 2 minutes, until they're fragrant and golden. This step unlocks their full flavor potential—untosted seeds won't give that satisfying crunch or nutty aroma.
I like to spread them on a parchment-lined tray for easy cleanup. For extra depth, add ½ tsp smoked paprika to the seeds while toasting. 🌻
Yeast Activation Check
Always test your yeast first by mixing it with 110°F water and 1 tbsp sugar. It should bubble vigorously within 5-10 minutes—if not, your yeast is dead. I keep a small jar of yeast in my freezer as a backup.
For this recipe, using both active dry yeast and instant yeast gives you flexibility: active dry for initial rise, instant for cold proofing.
Dough Hydration Balance
This dough is naturally sticky due to the high flour content, but don't panic—it's normal! If it feels too wet after mixing, add 1 tbsp flour at a time until it's just manageable.
I find using a stand mixer with a dough hook helps handle the sticky texture better than hand-kneading. The key is to knead just until the dough becomes smooth and elastic—overworking it will make the bread dense. 💧
Cold Proofing Hack
The overnight cold proof is what transforms this bread from good to extraordinary. Place your shaped loaves in the fridge for 12-16 hours—this slow fermentation develops complex flavors and creates that perfect crisp crust. I like to set a timer so I
Scoring for Crust Control
Before baking, use a sharp razor or serrated knife to score your loaves with a ½-inch deep crosshatch pattern. This prevents over-expansion and creates beautiful crust patterns. I like to dip the blade in water first to make clean cuts. The scoring also helps direct steam during baking, resulting in a crispier crust. Don't skip this step—it's what gives artisanal bread its professional look! ✂️
Baking Stone Advantage
If you don't have a baking stone, use an inverted baking sheet on the lower oven rack to mimic its effect. The stone helps create steam, which is crucial for that crisp crust. Preheat it for 30 minutes before baking.
For even better results, place a pan of water in the oven during baking to maintain moisture. The bread will rise beautifully and develop that signature oven-spring you crave in artisanal loaves. 🔥
Nutrition facts
Frequently asked questions
Can I substitute any of the flours in this 6-grain bread?
Yes, but adjust carefully! Replace 1:1 by weight—for example, swap buckwheat for amaranth flour (same earthy notes) or oat flour for cornmeal (adds slight sweetness). Avoid high-gluten flours like bread flour, as they’ll make the crumb too open. For a lighter texture, reduce rye by ¼ cup and add ¼ cup all-purpose flour.
Why does my dough feel too sticky after mixing?
This is normal with multi-grain doughs! The high flour content (especially whole grains) absorbs more moisture. Add 1 tbsp flour at a time until the dough pulls away from the bowl but stays slightly tacky. If it’s still too wet, chill for 15 minutes before kneading—this firms it up. Never over-flour, or the crust will toughen.
How do I fix if my bread turns out dense instead of crusty?
Dense bread usually means over-kneading or under-proofing. Next time, knead just until smooth (8-10 minutes max) and ensure the dough doubles in size during the 1-2 hour rise. For cold proofing, don’t skip the 12+ hour fridge time—this slow fermentation is key. Also, check your yeast: if it didn’t foam in 10 minutes, it was inactive.
Can I bake this bread without a Dutch oven or loaf pan?
Shape the dough into a freeform loaf on a parchment-lined baking sheet. For extra crustiness, bake on a preheated baking stone or inverted sheet tray. Brush with olive oil and sprinkle seeds before baking. Expect a slightly less structured loaf, but the flavor will still be fantastic.
How should I store leftover 6-grain bread?
Wrap tightly in plastic wrap or a beeswax wrap and store at room temperature for 3-5 days. For longer storage, freeze sliced bread in a sealed bag for up to 3 months. To revive stale slices, warm in a 350°F oven for 5-7 minutes—the crust will crisp up again.