
Side Dishes
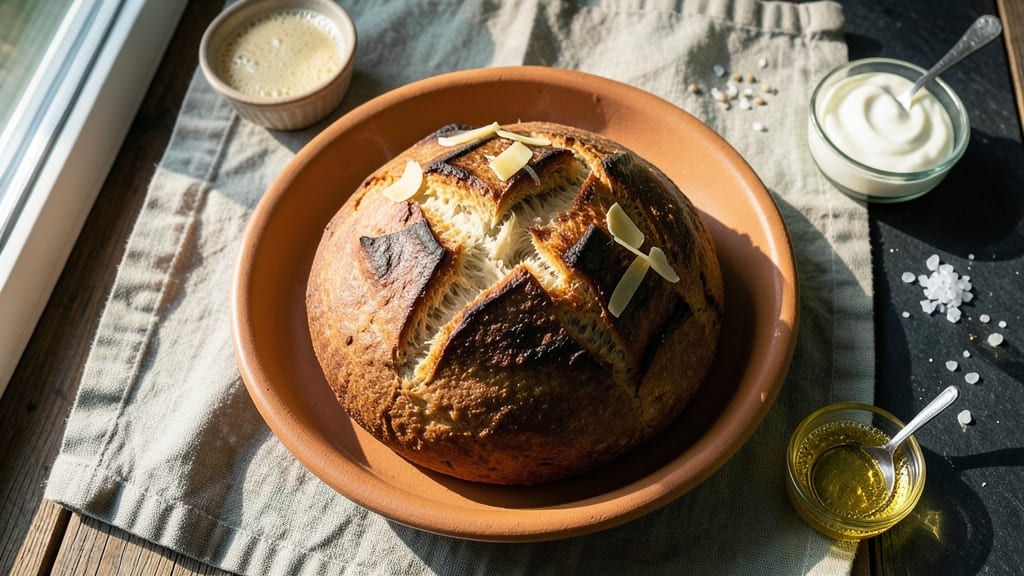
This atta flour bread recipe delivers the perfect balance of nutty, spiced crust and soft, open crumb—ideal for pairing with curries or enjoying on its own. The secret lies in the whole wheat atta flour, which develops a rich, toasty flavor when baked.
Unlike refined flour breads, this version stays hearty yet tender, with a slight chew that makes every bite satisfying.
What sets this recipe apart is the simple yet foolproof method that ensures consistent results. No special equipment is needed—just a mixing bowl, your hands, and a hot oven.
The dough requires minimal kneading, and fermentation (if used) enhances flavor without complicating the process. For a traditional touch, brush the baked bread with melted ghee for extra richness.
The outcome is a golden-brown crust with a fragrant aroma that fills your kitchen, while the interior remains soft and airy—just like homemade roti or phulka. This bread freezes well for up to a month, making it perfect for meal prep.
Whether you're serving it with dal, sabzi, or simply dipping into yogurt, it’s a versatile staple for any meal.
For cultural variations, try adding kesar (saffron) or ajwain (carom seeds) to the dough for extra depth. The key is patience—letting the dough rest ensures a lighter texture. This recipe is designed to be reproducible, so even beginners can achieve professional results.
Ingredients for atta flour bread
Whole wheat atta flour and warm water form the heart of this traditional bread.
| Ingredient | Amount | Notes |
|---|---|---|
| Atta Flour 🌾 | 3 cups | Whole wheat, finely milled |
| Warm Water 💧 | 1 ½ cups | 110°F for optimal activation |
| Plain Yogurt 🥛 | ½ cup | Full-fat for richness |
| Ghee 🧈 | ¼ cup | Melted for brushing crust |
| Sugar 🍚 | 1 tbsp | White granulated preferred |
| Salt 🧂 | ½ tsp | Fine sea salt preferred |
| Dry Yeast 🍞 | ¼ tsp | Active dry yeast preferred |
| Ajwain (Carom Seeds) 🌿 | 1 tsp | Optional for traditional flavor |
| Kesar (Saffron) 🌼 | ⅛ tsp | Optional for golden hue |
| Semolina (Sooji) 🌾 | ¼ cup | For dusting work surface |
| Sesame Seeds 🌻 | 1 tbsp | Toasted for garnish |
| Milk 🥛 | 2 tbsp | For brushing bread |
The atta flour is the star here—look for finely milled whole wheat flour at Indian grocery stores like Patel Brothers or Apna Bazaar for the best texture. If using store-bought whole wheat atta, sift it first for a lighter crumb. The warm water (110°F) activates the gluten properly, but don't let it get hotter than that or it'll kill the yeast. For the ghee, Amul or Patanjali brands are widely available and reliable. If you're adding kesar (saffron), soak it in 1 tbsp warm milk for 10 minutes to extract maximum color and flavor—don't skip this step if using it.
No ajwain (carom seeds)? Cumin seeds at half the amount work in a pinch, though the flavor won't be identical. Running short on yeast? Instant yeast at the same quantity is fine, but active dry yeast needs to be proofed first. For the yogurt, full-fat plain yogurt gives the best texture, but Greek yogurt can substitute at a 1:1 ratio. If you're making a large batch, divide the dough into portions and freeze them—they'll keep for up to 3 months and bake straight from frozen with just 10 extra minutes in the oven.
This dough needs at least 2 hours of rest at room temperature for optimal flavor development. For best results, shape the bread while the dough is still slightly sticky—it'll firm up as it rises. Brush the baked loaves with melted ghee mixed with milk while still warm for that signature golden sheen. Store wrapped in a clean kitchen towel to keep them soft for 3-4 days. The bread freezes beautifully—slice before freezing for perfect toast every time. Reheat in a toaster or oven at 350°F for 5 minutes to revive the crisp.
Why You'll Love This Recipe
- No-Knead Magic: I swear by this dough—just mix, rest, and bake. The atta flour does all the heavy lifting while you sip your chai.
- Ghee-Glazed Heaven: That slow-cooked ghee brush? Pure indulgence. The bread turns golden and crisp, with a melt-in-your-mouth softness that’s ridiculously satisfying.
- Weeknight & Feasts: Same dough works for everyday roti or impressive naan for guests. Leftovers toast into crispy chips—zero waste, all flavor.
- Pocketbook-Friendly Staple: Attta and yogurt are pantry basics, ghee stretches far, and sugar adds just enough sweetness without breaking the bank. My go-to for frugal, filling meals.
Step-by-step instructions for atta flour bread
Follow this method for a bread with a nutty, spiced crust and soft, open crumb every time.
Activate the Yeast and Prepare the Dough
In a small bowl, combine the 1.5 cups warm water (about 110°F) with the 1 tbsp sugar and 0.25 tsp dry yeast. Let this sit for 5-10 minutes until it becomes frothy—this confirms the yeast is active. If it doesn't bubble, your yeast may be inactive, and you'll need to start over.
In a large mixing bowl, combine the 3 cups atta flour, 0.5 tsp salt, 1 tsp ajwain (carom seeds), and 0.125 tsp kesar (saffron). Make a well in the center and pour in the yeast mixture along with the 0.5 cup plain yogurt and 0.25 cup melted ghee. Mix with a wooden spoon until a shaggy dough forms.
Knead the Dough Until Smooth and Elastic
Transfer the dough to a lightly floured surface and knead for 8-10 minutes until it becomes smooth, elastic, and no longer sticky. You'll know it's ready when it springs back slightly when pressed. If the dough feels too dry, add 1 teaspoon of warm water at a time; if too sticky, add a little more atta flour.
This kneading step is crucial for developing gluten, which gives the bread its characteristic open crumb structure. Work in a well-ventilated area, as the dough will release a strong aroma from the ghee and spices.
First Rise for Flavor Development
Lightly grease a large bowl with a bit of ghee, place the dough inside, and cover it with a damp kitchen towel. Let it rise in a warm place for 1-1.5 hours or until it has nearly doubled in size. The dough should feel light and airy when pressed gently with a finger.
During this first rise, the yeast will activate and create air pockets, which will expand during baking. Avoid placing the dough in direct sunlight or near a heat source, as this can cause uneven rising. The warm, consistent temperature is key to achieving the perfect texture.
Shape and Second Rise for Final Proof
Punch down the risen dough to release any large air bubbles, then divide it into 4 equal portions. Shape each portion into a smooth, round ball. Place the shaped dough balls on a baking sheet lined with parchment paper, cover with a damp towel, and let them rise for another 30-45 minutes until puffy and slightly domed.
For shaping, gently cup your hands around each dough ball and roll it between your palms to create a smooth surface. This step ensures even baking and a uniform texture. The second rise is shorter but essential for achieving that light, airy crumb structure.
Bake for a Nutty, Spiced Crust
Preheat your oven to 400°F. Brush the tops of the dough balls with the 2 tbsp milk for a shiny finish, then sprinkle generously with the 1 tbsp toasted sesame seeds. Bake for 20-25 minutes until the bread is golden brown and sounds hollow when tapped on the bottom.
For the best results, avoid opening the oven door during baking. The steam inside is crucial for creating that soft, open crumb. Once baked, transfer the bread to a wire rack to cool for 10 minutes before serving. The crust should be crisp and fragrant with the aroma of ghee and spices, while the interior remains soft and slightly chewy.
Pro Tips For Making Atta Flour Bread
- Knead Until Silky: Stop when the dough looks smooth—no need to overwork it. Atta flour bread needs just enough handling to bind; after 8-10 minutes, it’ll feel like a soft, elastic ribbon. Over-kneading makes it tough, and you’ll regret it when the bread turns out dense instead of light.
- Use Room-Temp Ghee: Cold ghee takes forever to melt into the dough. Warm it slightly in a bowl (just until it’s liquid but not hot) so it distributes evenly—no lumps, no wasted energy. Skip the microwave; a bowl of hot water does the job without risking burnt edges.
- Let the Dough Rest: I used to skip this, and the bread always came out flat. After mixing, cover the dough and let it sit for at least 30 minutes—this relaxes the gluten so the bread rises properly. Yes, it’s tempting to bake right away, but patience here makes all the difference.
- Shape Tightly, Seal Well: Press the edges firmly when shaping—this traps steam and helps the bread puff. If the dough cracks while baking, brush the top with a little warm water before sliding it into the oven. It’s messy, but the crust turns golden and crisp instead of dry.
Essential equipment for atta flour bread
Basic Kitchen Tools
You don’t need fancy equipment—just a few staples from your kitchen. Start with a large mixing bowl (I use stainless steel for durability) to combine ingredients. A wooden spoon works best for mixing the dough initially, while your hands take over for kneading.
For shaping, a lightly floured surface (I use semolina-dusted parchment paper) prevents sticking and makes cleanup easier. 🌾
Oven Essentials
A heavy-duty baking sheet (like All-Clad’s stainless steel) ensures even heat distribution for your bread. Preheat your oven to 400°F—this is non-negotiable for that perfect crust. If you’re baking multiple batches, use the middle rack to avoid hot spots.
For extra crustiness, I recommend a cast-iron skillet (like Lodge) for baking—it adds a rustic texture and retains heat beautifully.
Yeast Activation Tools
For activating yeast, grab a small glass bowl (I prefer Pyrex) and a thermometer (like Thermoworks’ digital) to check water temperature—110°F is ideal. A measuring cup (preferably stainless steel) ensures accurate yeast and water ratios.
Pro tip: Keep a spare yeast packet handy—sometimes batches fail, and you’ll want to troubleshoot quickly. 💡
Optional Upgrades
For a stand mixer (like KitchenAid’s Artisan), you can knead dough hands-free—just use the dough hook attachment on low speed for 5-6 minutes. A damp kitchen towel (or proofing cloth) keeps dough moist during rises.
For shaping, a rolling pin (I love marble-topped) helps create even rounds, though hand-rolling works just as well. If you’re adding kesar (saffron), a fine-mesh strainer ensures no strands go to waste.
Storage Solutions
Store baked bread in an airtight container (I use glass Tupperware) to keep it soft for 3-4 days. For freezing, parchment-lined bags prevent sticking and freezer burn.
When reheating, a toaster or oven at 350°F for 5 minutes restores crispiness. Label containers with dates—atta bread freezes well for up to 3 months! ❄️
Nutrition facts
Frequently asked questions
Why does my atta flour dough feel too dry or sticky?
Atta flour absorbs moisture differently than refined flour. If your dough is too dry, add 1 teaspoon of warm water at a time during kneading. For sticky dough, sprinkle semolina or extra atta flour while kneading—just don't overdo it, or the bread will become dense. The ideal dough should feel smooth, elastic, and slightly tacky but not wet.
Can I make this bread without yeast?
Yes! For a quick version, replace yeast with 1 tsp baking soda and 1 tsp vinegar (or lemon juice). Mix them with the warm water first, then proceed with the recipe. The texture will be denser but still delicious—great for flatbreads like roti. Fermentation from yogurt will still add flavor, but the rise will be minimal.
How do I get a crispier crust on my atta bread?
For extra crunch, bake at 425°F instead of 400°F and brush the dough balls with melted ghee mixed with milk before baking. Place them on a preheated baking sheet and bake for 15-20 minutes until deep golden brown. For restaurant-style crispiness, finish under a broiler for 1-2 minutes at the end.
What's the best way to store leftover atta bread?
Wrap cooled bread in a clean kitchen towel and store in an airtight container at room temperature for 3-4 days. For longer storage, freeze slices between parchment paper in a sealed bag for up to 3 months. Reheat frozen slices in a toaster or oven at 350°F for 5 minutes to restore crispness. Never store in plastic—it traps moisture and makes the bread soggy.
Can I substitute whole wheat flour for atta flour?
Not directly—atta flour is finely milled whole wheat with a higher protein content (about 12-14%) than regular whole wheat flour (10-12%). For a close substitute, mix 2 cups whole wheat flour + 1 cup all-purpose flour and add 1 tbsp vital wheat gluten to mimic atta's protein structure. The texture won't be identical, but it'll work in a pinch. For best results, use authentic atta flour from Indian markets.