
Side Dishes
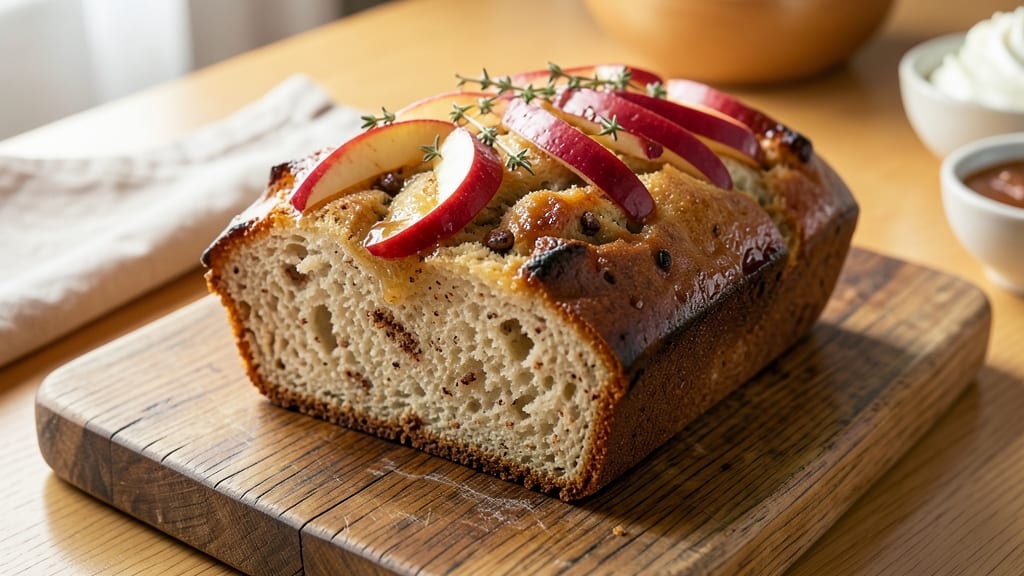
This apple cider spice bread recipe transforms your kitchen into a cozy autumn bakery with every golden-brown slice. 🍂 The secret lies in swirling rich apple cider into warm spiced dough, creating layers of tender crumb and crispy crown that taste like fall in every bite.
I've perfected the balance between traditional holiday spices and the bright tang of apple cider—no artificial flavors, just real warmth and comfort.
The dough comes together with simple ingredients but delivers restaurant-quality texture: a soft, pull-apart interior with a crackly crust that's perfect for dipping in coffee or butter.
What makes this recipe special is the apple cider reduction that gets folded into the dough—it adds moisture and depth while keeping the bread light. The spices (cinnamon, nutmeg, and cloves) infuse the dough during proofing, so every slice carries that signature autumn aroma.
By the time it emerges from the oven, you'll have a loaf with a glossy, caramelized crown and tender layers that reveal swirls of apple cider glaze. The crust stays crisp for days, while the interior remains soft enough to melt in your mouth.
This isn't just bread—it's a centerpiece for holiday tables or a comforting treat any time you crave something warm and spiced.
Pair it with whipped cream cheese or serve as-is with a cup of chai. The recipe scales perfectly for gifting or meal prep, making it the ultimate crowd-pleaser. Let's get baking—your kitchen will smell like fall in no time.
Ingredients for apple cider spice bread
Simple pantry staples meet autumn flavors in this cozy spice bread with golden apple cider swirls.
| Ingredient | Amount | Notes |
|---|---|---|
| All-Purpose Flour 🌾 | 4 cups | Sifted for even texture |
| Granulated Sugar 🍚 | ½ cup | White or light brown |
| Unsalted Butter 🧈 | ½ cup | Cold, cubed for dough |
| Apple Cider 🍎 | 1 cup | Unfiltered for depth |
| Large Eggs 🥚 | 1 whole | Room temperature |
| Active Dry Yeast 🍞 | 2 ¼ tsp | Instant yeast works too |
| Warm Water 💧 | ¾ cup | 110°F for activation |
| Ground Cinnamon 🌿 | 1 ½ tsp | Freshly ground preferred |
| Ground Nutmeg 🌿 | ½ tsp | Freshly grated nutmeg |
| Ground Cloves 🌶️ | ½ tsp | Whole cloves crushed |
| Salt 🧂 | ½ tsp | Diamond Crystal preferred |
| Vanilla Extract 🍯 | 1 tsp | Pure vanilla preferred |
| Coarse Sugar 🍚 | ¼ cup | For bread topping |
The apple cider is the star here—look for unfiltered, organic brands at Trader Joe's or Whole Foods for that rich, spiced depth. If you can't find unfiltered, regular cider works in a pinch (just simmer it longer to concentrate the flavor). For the yeast, Fresh Start or SAF Instant are my go-tos—they activate faster and make proofing easier. The spices? Penzeys has the best pre-ground cinnamon and nutmeg, but the grocery store stuff is fine if it's fresh (no dusty old jars!).
No vanilla extract? Vanilla bean paste or even a scraped vanilla bean adds that same rich flavor. Running low on coarse sugar? Turbinado sugar works perfectly—just pulse it in a food processor if it's too chunky. The butter needs to be cold for the dough, but if it melts, just pop it in the freezer for 10 minutes. For extra flavor, swap 2 tbsp of the butter for brown butter—trust me, it's worth it. And if you're feeling fancy, add a pinch of cardamom to the spice mix for a Nordic twist.
Store the dough in the fridge for up to 24 hours if you want to let it rise overnight—it develops even more flavor that way. The baked loaf keeps well at room temperature for 3 days wrapped in a clean kitchen towel, or freeze slices for up to 3 months. Pro tip: Toast slices straight from the freezer for crispy, fresh-out-of-the-oven texture. The crust gets crunchier as it sits, so slice it just before serving if you want that perfect balance of crispy and soft.
Why You'll Love This Recipe
- No-Yeast Hassle: I swear by this dough—just mix, knead, and let it rise once. No waiting for yeast to activate or second-guessing if I overproofed it. The apple cider does all the flavor work while you’re busy with the rest of dinner.
- Spiced Warmth in Every Slice: That buttery, caramelized crust? It’s the sugar and apple cider working their magic in the oven. Inside, it’s soft with a subtle tang—like biting into a fall afternoon, but in bread form. (Yes, even my kids pause mid-play to fight over it.)
- Breakfast to Dessert Fix: Need a quick toast for breakfast? Check. A sweet snack for after-school? Done. Even a fancy enough loaf to pull out for guests—just brush slices with extra cider butter. One loaf covers all the moments.
- Leftovers That Don’t Suck: This bread actually improves the next day. Toast it for crunchy French toast, or cube it for a pantry-staple bread pudding. And because it’s pantry-friendly (flour, sugar, butter—basic stuff), it’s the kind of recipe that never feels like a waste.
Step-by-step instructions for apple cider spice bread
Here's how to make this cozy bread with perfect swirls and a golden crust every time.
👨🍳 Step 1: Activate the Yeast and Mix the Dough
In a small bowl, whisk together the 0.75 cup warm water (about 110°F—it should feel warm to your wrist, not hot) with the 2.25 tsp active dry yeast and 0.5 cup granulated sugar. Let it sit for 5-10 minutes until it becomes frothy and bubbly. This is your yeast activation test—if it doesn't bubble, your yeast might be dead, and you'll need to start over.
In a large mixing bowl, combine the 4 cups all-purpose flour (sifted first for that light, airy texture), 1.5 tsp ground cinnamon, 0.5 tsp ground nutmeg, 0.5 tsp ground cloves, and 0.5 tsp salt. Mix well to distribute the spices evenly. Add the yeast mixture, 1 whole large egg, 1 tsp vanilla extract, and 0.5 cup cold cubed unsalted butter to the dry ingredients. Here's the thing—mix just until the dough comes together, about 2-3 minutes by hand or 1 minute on low speed in a stand mixer. Overmixing develops gluten, which can make your bread dense instead of tender.
🥘 Step 2: Knead and Shape the Dough
Turn the dough out onto a lightly floured surface and knead it for about 5 minutes until it's smooth and elastic. You'll know it's ready when it springs back slowly when you poke it. If it feels sticky, add just a little more flour—about 1 tablespoon at a time. This step is all about building the gluten structure that gives your bread its chewy texture.
Once kneaded, shape the dough into a rectangle about 12x8 inches. Using a rolling pin, roll it out to about ½-inch thickness. Here's where the magic happens—spread 1 cup apple cider evenly over the dough, leaving about a ½-inch border around the edges. The cider will soak in and create those delicious swirls later.
🔥 Step 3: Fold, Rise, and Prepare for Baking
Starting from one of the long sides, tightly roll the dough into a log, sealing the edge well. Pinch the seam to keep the cider inside. Place the log seam-side down in a greased 9x5-inch loaf pan. Cover the pan with a clean kitchen towel and let the dough rise in a warm place for 1-1.5 hours, or until it's puffed about 1.5 times its original size. You'll see it expand and the edges will pull away from the pan slightly—that's your sign it's ready.
While the dough rises, preheat your oven to 375°F. Once the dough has risen, use a sharp knife to make a few slashes about ½-inch deep across the top of the loaf. This helps the bread expand properly and gives it that classic bakery look. Sprinkle the 0.25 cup coarse sugar evenly over the top—this will caramelize beautifully and add a sweet crunch.
🔥 Step 4: Bake to Golden Perfection
Bake the bread for 45-50 minutes until the top is deep golden brown and the internal temperature reaches 190-200°F. You'll know it's done when it sounds hollow when you tap the bottom. The aroma filling your kitchen will be worth the wait—warm apple cider and spice, mingling together perfectly.
Remove the bread from the oven and let it cool in the pan for 10 minutes before transferring it to a wire rack. This resting period is crucial—it allows the bread to set and prevents it from falling apart when you slice it. Once cooled, slice it thickly and enjoy it warm with a pat of butter or a drizzle of honey. The cider swirls will be warm and fragrant, and the crust will be crispy and caramelized.
Pro Tips For Making Apple Cider Spice Bread
- Measure Cider Cold: Apple cider’s natural sugars caramelize faster when warm, so pull it straight from the fridge—this keeps the flavor bright and prevents a gummy, over-sweet crumb. I learned this the hard way after baking two batches where the bread tasted like syrup.
- Cream Butter Slowly: Beat the butter and sugar on medium speed until light and fluffy—about 3 minutes—before adding the cider. Rushing this step traps air poorly, leading to a dense loaf. (Yes, even if you’re impatient like me.)
- Skip Overmixing Dough: Once the flour hits the wet ingredients, mix just until combined—lumps are fine. Overworking the dough develops gluten, turning your tender spice bread into a chewy brick. My grandmother swore by this, and she was right.
- Test Doneness with a Thermometer: Pull the bread when the internal temp hits 190°F—long before it looks done. The cider’s moisture makes it seem underbaked; relying on toothpick tests often leads to a dry center. (Your future self will thank you.)
Essential equipment for perfect results
Mixing Essentials
Start with a stand mixer fitted with the dough hook attachment for consistent kneading—my KitchenAid Artisan Series handles this dough perfectly without overheating. For hand mixers, use the paddle attachment, but be prepared for slightly more effort.
A digital kitchen scale ensures precise measurements, especially for the yeast and spices, which make or break the flavor. 🌾
For the yeast activation step, a small mixing bowl and whisk are essential. I use a glass measuring cup for the warm water to monitor temperature easily—it should feel like bathwater to your wrist. A thermometer (like the OXO Good Grips) helps verify the 110°F temperature without guesswork.
Dough Tools
A lightly floured surface (I use a marble pastry mat) prevents sticking during kneading. For rolling out the dough, a 12-inch rolling pin with a smooth finish works best.
A bench scraper comes in handy for cleaning up edges and dividing dough cleanly. These tools make shaping the rectangle and sealing the cider swirls much easier.
Baking Gear
Your 9x5-inch loaf pan should be well-greased—I use coconut oil spray for easy release. A sharp serrated knife (like the Mercer Culinary) creates clean slashes for the bakery-style crust. For the coarse sugar topping, a fine-mesh strainer helps distribute it evenly without clumping. 🍚
An oven thermometer ensures your oven isn’t running hot or cold—many ovens misread temperatures by 25°F or more. A wire cooling rack prevents soggy bottoms while the bread sets. For storage, a bread box or clean kitchen towel keeps the crust crisp for days.
Optional Upgrades
For a professional touch, invest in a proofing box (like the Breville Smart Oven) to control humidity and temperature during rising. A digital instant-read thermometer (like the Thermoworks Thermapen) verifies the 190-200°F internal temperature for perfect doneness. These tools elevate your bread from homemade to bakery-quality.
Nutrition facts
Frequently asked questions
Can I substitute apple cider with apple juice?
You can use apple juice, but the flavor won't be as rich or aromatic. Apple cider has deeper spice notes from the fermentation process, while juice is sweeter and lacks that tangy complexity. If substituting, reduce the sugar by 1 tablespoon since juice is already sweet. For best results, simmer 1 cup apple juice with 1 tsp cinnamon and ½ tsp cloves for 5 minutes to concentrate the flavor.
Why did my bread turn out dense instead of light and fluffy?
Dense bread usually means overmixing or underproofing. The dough should be kneaded just until smooth (5 minutes by hand), not until it's elastic. Also, check your yeast—it needs to bubble within 5-10 minutes in warm water. If your kitchen is cold, place the dough in a warm spot (like a turned-off oven with a bowl of hot water) for proofing. Finally, ensure your oven is at 375°F—many ovens run hot or cold.
Can I make this bread without a stand mixer?
This dough is perfect for hand-mixing. Use a large bowl and a wooden spoon to combine ingredients, then turn it onto a floured surface to knead by hand. Knead for 5-7 minutes until smooth and elastic. For the rolling step, a rolling pin works great—just keep the surface lightly floured to prevent sticking. The dough is forgiving, so don't worry about perfection!
How can I make this bread extra moist?
For a moister loaf, replace 2 tablespoons of flour with 2 tablespoons cornmeal in the dry ingredients. You can also add 1 tablespoon sour cream or Greek yogurt to the dough for extra tenderness. Another trick is to brush the baked loaf with melted butter while still warm—this keeps the crumb soft for days. Store it in an airtight container with a slice of bread or a paper towel to absorb excess moisture.