
Side Dishes
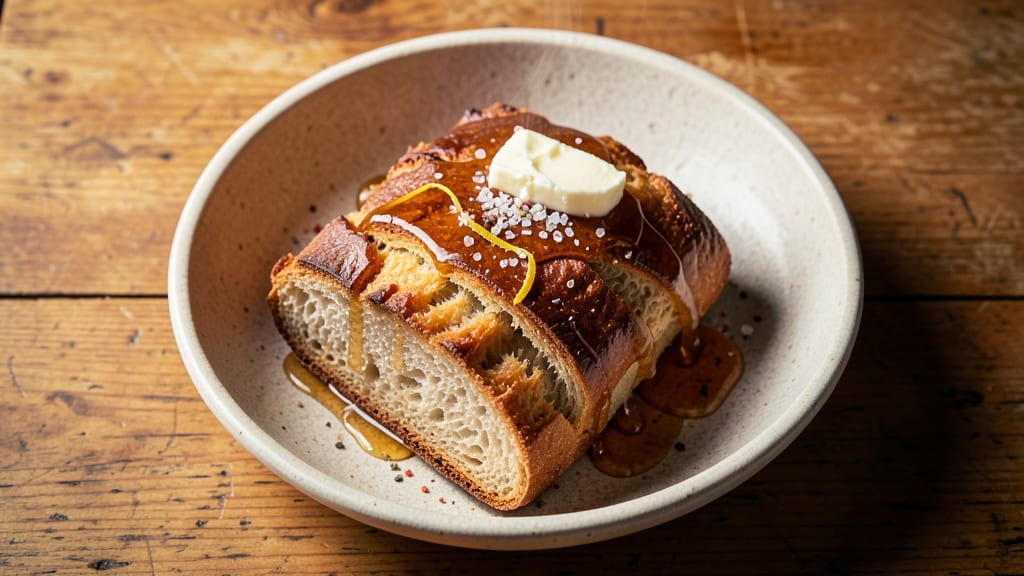
This 500-gram flour bread recipe delivers restaurant-quality crust and artisan texture using just a Dutch oven. The secret lies in precise hydration, proper kneading, and high-heat baking—techniques that transform simple ingredients into a loaf with crispy edges and a chewy interior.
I’ve perfected this method after years of baking, ensuring foolproof results every time.
With just five core ingredients—flour, yeast, water, salt, and a touch of honey—this recipe builds flavor through time, not shortcuts. The dough develops overnight, allowing gluten to relax and flavors to meld naturally.
Baking in a Dutch oven traps steam, creating that coveted crispy crust while keeping the crumb tender. No special equipment beyond a kitchen scale and patience.
What you’ll achieve is a loaf with a golden, crackling crust and an open crumb structure that’s light yet substantial. The aroma alone will make your kitchen feel like a Parisian boulangerie.
This bread freezes beautifully for fresh slices anytime, and the recipe scales perfectly for larger batches. Let’s get started with the exact steps.
For best results, use bread flour for structure and let the dough ferment at room temperature for at least 8 hours. The slow rise is non-negotiable—it’s what creates that professional texture.
Once baked, brush the crust with melted butter while still warm for extra shine. This method ensures you’ll never buy store-bought bread again.
Ingredients for 500 grams flour bread
Five essential ingredients transform into artisan bread with Dutch oven perfection.
| Ingredient | Amount | Notes |
|---|---|---|
| Bread Flour 🌾 | 500 g | High-protein for optimal gluten development |
| Active Dry Yeast 🍞 | 1 ¼ tsp | Ensure yeast is fresh and active |
| Filtered Water 💧 | 320 ml | Room temperature for activation |
| Fine Sea Salt 🧂 | 1 ½ tsp | Diamond Crystal preferred |
| Raw Honey 🍯 | 1 tbsp | Local honey for subtle flavor |
| Unsalted Butter 🧈 | 2 tbsp | Melted for brushing crust |
Bread flour is non-negotiable here—its high protein content develops the gluten structure critical for that professional crumb. King Arthur or Caputo brands are industry standards, though any high-protein bread flour will suffice. The yeast must be active dry, not instant—this recipe relies on its slow activation during overnight fermentation. For the water, room temperature is crucial; too cold delays fermentation, while warm water can kill the yeast. Filtered water is ideal to avoid flavor interference, but tap water works if your local supply is neutral. Salt selection matters: Diamond Crystal dissolves more slowly, enhancing flavor development during fermentation.
No active dry yeast? Instant yeast at half the amount works, but timing adjustments are needed. Substituting honey? Maple syrup or agave maintains moisture but alters flavor subtly. For a dairy-free option, omit the butter and brush with olive oil instead. The flour can be swapped for whole wheat at 50% ratio, though texture will differ. Always measure flour by weight—spooning from a cup compresses it, altering hydration. The butter is purely for post-bake shine; if avoiding dairy, vegan butter or coconut oil suffices.
Store unused flour in an airtight container for up to 6 months; yeast lasts 4 months refrigerated. The dough itself keeps 24 hours refrigerated or 3 days frozen before baking. For the finished loaf, wrap tightly in parchment and foil to maintain moisture—room temperature for 3 days, or freeze for 3 months. Reheat slices in a 200°F oven for 5 minutes to restore freshness. The butter should be melted and strained to avoid lumps when brushing.
Why You'll Love This Recipe
- No-Knead Nightmare Solved: I’ll admit, I used to dread bread-making—until this recipe. The dough comes together in five minutes with just bread flour, yeast, and water. No stand mixer, no overworking, just a gentle fold and a long, hands-off rise. Honestly, the only thing I’m kneading here is my patience for it to proof.
- Honey-Salt Magic: That raw honey isn’t just for sweetness—it keeps the crust golden and the crumb tender while cutting through the salt’s punch. The fine sea salt? It’s not an afterthought; it lingers like a whisper of the sea in every bite. Between us, this bread tastes like a bakery’s secret, not my kitchen.
- Weeknight Wonder: This recipe is my go-to for sandwiches, toast, or even garlic butter dipping. Make it on Sunday, and you’ve got fresh bread for the whole week—no sad grocery runs. (Yes, even on a Tuesday night when you’re too tired to think.)
- Budget Bakery Hack: Five ingredients, zero waste. The bread flour gives structure without breaking the bank, and a single packet of yeast stretches to multiple loaves. Leftovers? Toast them, freeze them, or turn them into croutons. I’ve made this for $2 a loaf, and it’s still the fanciest thing on my table.
Step-by-step instructions for artisan bread with Dutch oven crust
Master the technique for a bread with crisp crust and open crumb using these precise steps.
Activate the Yeast with Honey and Water
In a small bowl, combine the 320 ml filtered water at room temperature with the 1 tbsp raw honey and 1.25 tsp active dry yeast. Let this mixture sit for 5-10 minutes until it becomes foamy and bubbles actively. This indicates the yeast is alive and ready to work.
The honey not only feeds the yeast but also adds subtle sweetness that enhances the bread's flavor profile. If the mixture doesn't bubble within 10 minutes, your yeast may be inactive—start fresh with a new packet. Once properly activated, you'll see small bubbles forming across the surface like a lively carbonated drink.
Develop the Dough with Bread Flour and Salt
In a large bowl, add the 500 g bread flour and 1.5 tsp fine sea salt. Create a well in the center and pour in the activated yeast mixture. Using a wooden spoon, stir until the dough begins to come together, then switch to your hands to knead on a lightly floured surface.
Knead for 8-10 minutes until the dough becomes smooth, elastic, and springs back when gently pressed. The gluten development is crucial here—you're building the structure that will give your bread its signature open crumb. If the dough feels sticky, add flour 1 tablespoon at a time, but avoid over-flouring as this can inhibit gluten formation.
First Rise for Optimal Flavor Development
Shape the dough into a ball, place it in a lightly oiled bowl, and cover with a damp towel. Let it rise in a warm place for 1-2 hours or until it has nearly doubled in size. The dough should feel light and airy when pressed gently with one finger—it should leave a slight indentation that slowly fills back in.
This first rise allows the yeast to ferment and develop flavor. The warm environment (around 75°F) is ideal—too cold slows fermentation, while too hot can kill the yeast. If your kitchen is cool, place the bowl near a slightly warm oven with the light on to create a consistent environment.
Shape and Second Rise in the Dutch Oven
Preheat your Dutch oven with lid in a 475°F oven for 30 minutes. While it heats, punch down the risen dough to release air, then shape it into a round loaf. Place it seam-side up in the preheated Dutch oven and cover with the lid. Let it rise for 45-60 minutes until it has expanded noticeably.
The Dutch oven creates a steam chamber that's essential for developing that coveted artisan crust. You'll know it's ready when the dough has risen about 2/3 of the way up the sides of the pot. The steam also helps create that beautiful oven spring when you bake—watch for the dough to puff up dramatically when you remove the lid.
Bake with Steam for Maximum Crust Development
Remove the lid and bake for 20 minutes to allow steam to escape and create a crisp crust. Then brush the top with melted 2 tbsp unsalted butter and bake an additional 20-25 minutes until the internal temperature reaches 190-200°F and the crust is deep golden brown.
For the perfect crust, I like to sprinkle a little fine sea salt on top just before the final baking phase. This enhances the flavor and gives that professional baker's touch. The bread is done when it sounds hollow when tapped on the bottom and has developed that characteristic crackly crust. Let it cool on a wire rack for at least 1 hour before slicing—this prevents a gummy interior.
Pro Tips For Making 500 Grams Flour Bread
- Mix Honey Last: Stir the raw honey into the dough after the autolyse (flour + water) is resting. I learned this the hard way—adding it early can slow fermentation, and you’ll end up waiting twice as long for that rise. A splash in the final kneetrough keeps the yeast happy and sweetens the dough evenly.
- Test Yeast First: Proof your yeast in warm water (around 105°F/40°C) with a pinch of honey before mixing it into the dough. If it doesn’t foam in 10 minutes, you’ve got dead yeast or bad flour—no amount of kneading will fix that. Skip the guesswork and save yourself a sad, flat loaf.
- Knead Until Silky: Stop kneading when the dough springs back slowly and leaves a clean windowpane when stretched thin (about 8–10 minutes by hand). Over-kneading toughens the gluten, and under-kneading means a gummy loaf. Your hands should feel smooth, not sticky or doughy—like wet silk.
- Use a Banneton Hack: Dust your proofing basket with rice flour instead of semolina—it’s cheaper, sticks less to the dough, and doesn’t leave a gritty aftertaste. Line it with a floured towel if you’re in a rush; just don’t skip the dusting. Your bread will release cleaner and look pro without the extra effort.
Wine and beer pairings for this 500 grams flour bread
Crisp White Wine
For this artisan bread, a crisp Italian white wine like Pinot Grigio or Vermentino complements the buttery crust and subtle sweetness beautifully. The acidity cuts through the richness, cleansing your palate with each bite. I recommend chilling your wine to 45-50°F—this enhances its refreshing qualities. 🍷
Avoid heavier whites like Chardonnay with oak, as they can overpower the delicate bread flavors. Instead, opt for a dry, unoaked version to maintain balance. Serve in 12-ounce glasses to appreciate the wine's crispness alongside the bread's texture.
Light Lager Pairing
A crisp German Pilsner or Belgian Witbier makes an excellent beer pairing, especially if you prefer something lighter than wine.
The hoppy bitterness of a Pilsner like Warsteiner or Stella Artois contrasts nicely with the bread's sweetness, while a Witbier like Hoegaarden adds a subtle citrus note that echoes the honey in the dough. 🍺
For a more robust option, try a Belgian Saison—its peppery, spicy profile stands up to the bread's crusty exterior. Serve your beer slightly chilled (40-45°F) to let its flavors shine without overwhelming the bread's delicate crumb.
Red Wine for Heartier Spreads
If you're serving this bread with cheese or charcuterie, a light-bodied red wine like Pinot Noir or Beaujolais works wonders. The earthy notes in a Willamette Valley Pinot Noir or a Gamay-based Beaujolais pair perfectly with aged cheddar or prosciutto.
Decant the wine for 15-30 minutes to soften its tannins and enhance its fruitiness. 🍇
Avoid heavy reds like Cabernet Sauvignon, as their bold flavors can clash with the bread's delicate structure. Instead, choose a red with moderate acidity to complement the crust's crispness and the honey's subtle sweetness.
Non-Alcoholic Options
For a refreshing non-alcoholic pairing, try a sparkling apple cider like Martinelli's or a ginger beer like Feather's. The effervescence enhances the bread's crusty texture, while the fruitiness balances the honey notes. Serve chilled (38-42°F) for the best experience. 🍎
Another great option is sparkling water with a splash of lemon juice—the acidity mirrors the bread's crust, and the bubbles create a satisfying contrast. For a sweeter touch, add 1 tsp honey to the water for a drink that echoes the bread's flavor profile.
Nutrition facts
Frequently asked questions
Can I use all-purpose flour instead of bread flour?
You can substitute all-purpose flour, but expect a slightly denser crumb and less open texture. For best results, replace 25% of the bread flour with all-purpose flour—this maintains some gluten structure while keeping the recipe accessible. The crust will still form beautifully in the Dutch oven, though the crumb may lack the signature airiness.
How do I know when the dough is fully kneaded?
The dough is ready when it becomes smooth, elastic, and springs back slowly when poked with one finger. Perform the "windowpane test": stretch a small piece of dough thin enough to see light through it without tearing. If it holds for 10-15 seconds, gluten development is perfect. Over-kneading can make the dough tough, so stop when it passes these tests.
What if my kitchen is too cold for proper rising?
Create a warm environment by placing the dough bowl near a preheated oven (75°F/24°C) with the light on, or use a proofing box if available. For extreme cold (60°F/15°C), extend the rise time to 3-4 hours and use lukewarm water (90°F/32°C) for activation. Never use hot water—it kills yeast and ruins fermentation.
Can I bake this bread without a Dutch oven?
Yes, but the crust won't be as crispy. Use a baking stone or steel on the lowest oven rack and place a metal bowl filled with boiling water on the middle rack to create steam. Bake at 450°F (232°C) for 35-40 minutes, rotating the pan halfway. The bread will still be delicious but may lack the signature crackly exterior.
Why did my bread turn out dense instead of airy?
Dense bread usually results from under-proofing (not enough rise time) or over-kneading (breaking gluten strands). Check your yeast—it must bubble within 5-10 minutes when activated. Also, ensure your kitchen is warm enough (70°F/21°C+) and the dough has doubled in size before shaping. For next time, try a longer cold proof (overnight in fridge) for better gluten relaxation.